Over the years we implemented many different methods to set up Sonargraph for your project. Some of them are now quite outdated and are only kept in the tool for compatibility reasons. This article is meant to help you with your initial setup and chose the most effective method for your particular circumstances. There is one section for each language supported by Sonargraph.
General Recommendations
Sonargraph maintains a folder for each software system, that contains a description of your project, the locations of source folders (and class folders for Java), your architecture model and all other parts of a Sonargraph quality model. We call this folder the Sonargraph system folder. It only contains text files (mostly XML) and should ideally be placed in the root directory of your VCS (version control system) repository. You also should add this folder to your VCS, since the Sonargraph model will evolve together with your software system. This will allow you to share one Sonargraph model with all the developers working on your project.
Each Sonargraph software system contains at least one module. Modules usually correspond to the modules or sub-projects in your IDE.
How to initially create this folder for your project is the subject of this article. The folder should have the name of your software system and always ends with ‘.sonargraph’.
Java
For Java projects the best way to setup your project mainly depends on the build tool you are using. If you are using ANT or another build tool not mentioned here you can import directly from your IDE or do a manual setup. It is important to understand that Sonargraph must read all your class files (not only the sources) to do an analysis. That means you must build your project before importing it.
Sonargraph also allows Groovy, Kotlin or Scala files in your project. Only Kotlin is supported on the source level. For the two other languages some metrics derived from analyzing the source code will be missing.
Maven
We recently added new functionality the Sonargraph Maven plugin so that it is able to create or update the Sonargraph system folder you. Therefore this is now the recommended way to import Maven projects into Sonargraph. We also have a built-in Maven importer in the Sonargraph application, but we consider that one as deprecated. It will soon be removed from Sonargraph.
Once you added our plugin to your root pom file you can call:
mvn clean package create-or-update-systemThis goal does not require a license and if you don’t add any parameters your brand new Sonargraph system folder will have the project name specified in your pom file. Now you can start Sonargraph and open your new Sonargraph system. Press the refresh button on the top left of the Sonargraph application window and Sonargraph will analyze your project.
One benefit of using this method that it will also mark generated code not to produce issues and import the module dependencies from the pom file. This allows Sonargraph to check for unnecessary module dependencies, i.e. dependencies that are declared in the POM file, but are not present in the code. It will also find the opposite problem, dependencies in the code that are not declared in the POM file.
Should you later add, rename of remove modules you can run the same goal again to update your already existing Sonargraph system folder.
Gradle
Our Gradle plugin also recently got the capability to create or update the Sonargraph system folder for you. Just add our plugin to your root gradle build file and then call:
./gradlew clean build sonargraphCreateOrUpdateSystemThis task does not require a license and if you do not add any parameters it will use the project name from your build file. Once finished you can start Sonargraph and open and refresh your new system.
Like with Maven above, one benefit of using this method that it will also mark generated code not to produce issues and import the module dependencies from the Gradle build file. This allows Sonargraph to check for unnecessary module dependencies, i.e. dependencies that are declared in the build file, but are not present in the code. It will also find the opposite problem, dependencies in the code that are not declared in the build file.
Should you later add, rename of remove modules you can run the same task again to update your already existing Sonargraph system folder.
Bazel
Here you can use the Bazel workspace importer from File/New/System.
Other Cases
In all other cases we recommend either directly importing from your IDE (Eclipse or IntelliJ are supported) or do a manual setup based on “Build Units”. Please note that the IntelliJ import does not work properly if you have setup your project based on Gradle or Maven (see above).
The Build Unit importer (organized as a wizard) is the most versatile, but also most complex importer. It should always work and you can use it, when the other methods do not work properly in your specific context. It assumes that you have a system how to name your source and class root directories.
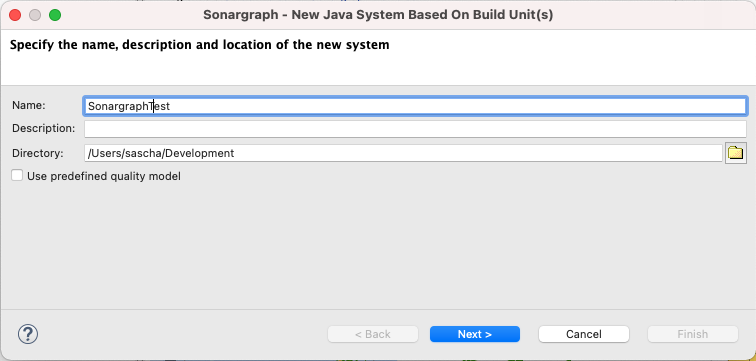
In the first dialog you just specify the name of your future Sonargraph system folder and its location. If you check the box “use predefined quality model” you can add one of our predefined quality models to your system.
Here is the next dialog where all the action is happening:
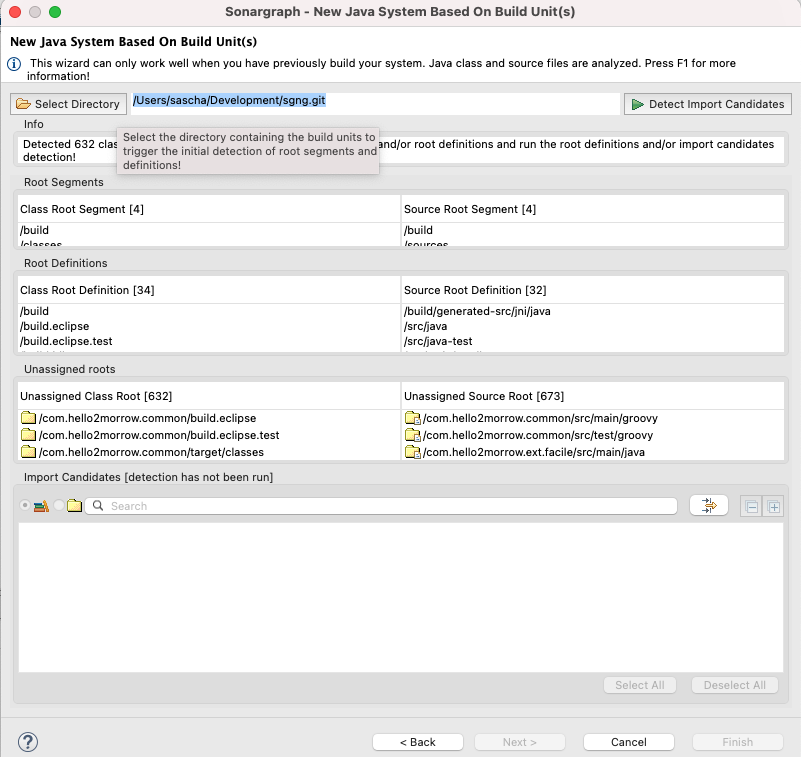
Once you clicked on “Select Directory” on the top left the page the wizard will search for all source and class root directories located under the selected directory. I recommend again to select the root directory of your VCS repository.
Now, if you have a complicated setup like in the example above you should first reduce the root segments as much as possible. For example, if your sources are always under a directory starting with ‘src’, that should be in the list. If you have generated code, that should also be added. So if your generated code is somewhere under ‘build’ also leave ‘build’ in the list of source root segments. All the other ones can be deleted. Then do the same for class root segments. Once finished you can click on ‘Detect Import Candidates’ and you will get a list of importable modules.
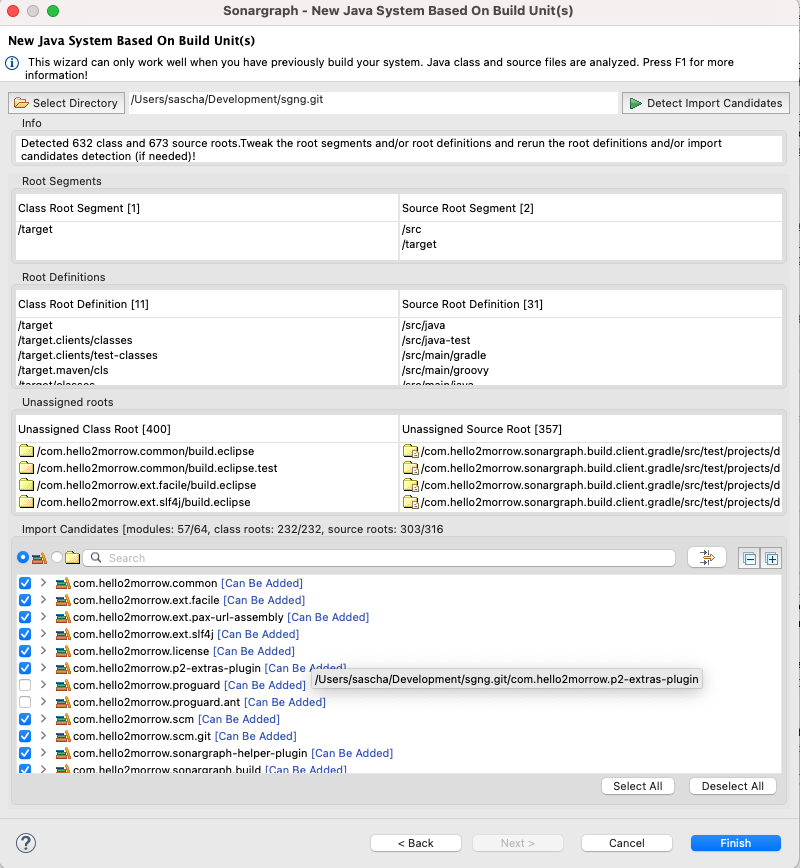
If the result is to your satisfaction, select the modules you wish to import and click finish. Otherwise refine the list of root segments and/or root definitions. Once finished you only need to click on the refresh button on the top left of the Sonargraph application window and Sonargraph will analyze your project.
Btw, the build-unit importer like many other Sonargraph features, also has a context help function, that can either be reached via the F1 key or by pressing the little question mark button on the bottom left.
C#
We recently did a complete rewrite of ur C# analyzer based on Microsoft’s Roslyn parser. You can directly import a solution file to create a Sonargraph system. Only two preconditions must be met:
- You must have .Net 8 or higher installed on your machine.
- You must have successfully built the system before analyzing it.
Once you created the Sonargraph system you can later change the module selection from your solution via File / New / Module / Update C# module selection.
C and C++
For the C and C++ the best import solution is based on our new ccspy tool. The details have already been laid out in a previous blog article.
Python
Usually a Python system consists of a single Sonargraph module. It is best to create the Sonargraph system in your repository root folder. To analyze a Python system first create an empty software system and then add a Python module via “File / New / New Module / New Python Module”. Then add a root directory to the module that points to the source root directory. If your Python system uses a virtual environment you can configure that via “System / Configure/ Python”. I recommend to check the box for the recreation of “skeletons”. Once the setup is complete save you system and then analyze it by pressing the “Refresh” button.