Free Trial and Licensing
ArcTree is a plugin for IntelliJ IDEA that visualizes code dependencies for Java and Kotlin projects in a unique and powerful way. It is a commercial product which needs a subscription to run after a free evaluation period. To test the plugin just download it from the JetBrains marketplace. When it is started the first time it will automatically acquire an evaluation license that allows you to test the plugin for free for a period of two weeks. If you cannot access the Internet from IntelliJ you will need a file-based evaluation license. To do so you must register on www.hello2morrow.com and click on the red “Try Now” button.
If you want to continue using it after that you can buy a subscription (under 100 USD per year) from our website www.hello2morrow.com. Otherwise just uninstall the plugin. The different license options are described in more detail later in this article.
Using the Tool Window
After installing the plugin you should see the ArcTree tool window icon in the right IntelliJ IDEA toolbar. Click in the icon to make the tool window appear.

After the tool window appears please push the “create” icon, which should be the leftmost icon in the AcTree tool window.

Now ArcTree will build a dependency model of your project, which can take a bit of time depending on the size of your project and the specific capabilities of your computer. You should see a progress bar in the status bar at the bottom of the IntelliJ screen.

Once the model is complete, the ArcTree dependency visualization becomes visible in the tool window. As usual your project is displayed as a tree. You can now expand inner nodes to see more details:

Once you do code changes the dependency model will be outdated. ArcTree warns you about that. You can also see it in the create icon, which will have a red dot on the top right once the model is not up to date anymore. To update the model simply press the create button again.
Basic Functionality
ArcTree’s main tool window shows your project as a tree using arcs depicting dependencies between elements of the tree. The arcs are directed counterclockwise, meaning arcs on the left side go downwards, while arcs on the right side go upwards. The top-level elements of the tree are your modules followed by a special node for external elements. The structure of the tree is based on the physical layout of your project and the leafs of the tree are programming elements like classes, fields or methods. In the default display mode ArcTree sorts the elements of the tree in such way that upward going dependency arcs are minimized (as long as you use ‘Levelize’ sorting mode, which is the default). If there are no cyclic dependencies this sorting mode will guarantee, that there are no upward going arcs on the rights side. The visualization will reveal the actual layering of your system . A well designed system will have very few, if any arcs on the right side. The more arcs you see on the right side, the more your system is suffering from structural erosion and the more cyclic dependencies you have.

You might have already guessed that the thickness of arcs is related to the number of code dependencies inside of the arc. Also, please note the horizontal divider lines, which depict levelization. Everything between two divider lines can be considered to be parallel to each other, in other words they do not depend on each other and therefore are on the same level.
Elements involved in a cyclic dependency are emphasized using a red background. In the example above the two root directories src/main/java and src/main/kotlin depend on each other and therefore form a cycle.
Please remember that divider lines and red background for cyclic elements are only available in the ‘Levelize’ sorting mode.
Auxiliary Tool Windows
ArcTree comes with two auxiliary tool windows: “ArcTree Dependencies” and “ArcTree Properties”.

The properties tool window just displays properties off the current selection in ArcTree’s main tool window. The dependencies view shows the dependencies associated with the current selection in the main tool window. Double clicking on any line in the dependencies view will take you to the location in the code causing this particular dependency. You can sort the items in the dependencies view by clicking on a column header. A second click on the same header will reverse the sort order.
By default the dependencies tool window shows incoming and outgoing dependencies for the element selected in ArcTree. You can change that by changing the view options of the tool window. They can be reached by clicking on the icon of three dots arranged vertically on the top right of the tool window.

Internal dependencies are dependencies where both ends are inside of the currently selected element. For example, if a source file is selected, a method call to another method in the same class is considered an “internal” dependency.
Selection Logic
In the main tool window you can either select elements of the project tree or dependency arcs. If you select an element, the dependencies tool window will by default display the incoming and outgoing dependencies of that element. You will also notice that only the in- and outgoing dependencies of that element are still displayed in green. All other arcs turn to gray. That makes it easier to find out which elements are connected to the current selection. Please also note that the connected elements are highlighted with a different background compared to not connected elements.
If you select a dependency arc the dependencies tool window will show all the dependencies contained in that arc.
ArcTree Tool Bar
The ArcTree tool bar is used to configure ArcTree, manage the license and select view options.

We already discussed the first icon, aka “create” button. The red dot on the top right indicated that the dependency model is currently out of date. The next button (trash can icon) lets you remove the current dependency model, which will also release the memory used to store the model.
The magnifying glas button opens the search dialog.

Once you start typing in the pattern field the matching elements will be displayed below. You can use wildcards like ‘*’ (any sequence) and ‘?’ (any single character) in the search pattern. Once you select a result in the list below you can choose between “Reveal” and “Reveal with Focus”. In the first case ArcTree will simply select the chosen element in the ArcTree tool window. If you chose “Reveal with Focus” the focus dialog will come up that allows you to set a focus. The focus concept will be explained a little further down in this tutorial.
The next button is the “Home” button, which brings you back to the initial state of the tree where only the top level nodes are visible. Then we have two buttons for navigating between states of the ArcTree window. Clicking on “Backward” will bring you back to the state of the tree before your last action, while “Forward” does the opposite. Of course “Forward” only works when you moved “Backward” at least once.
Then we have two buttons that control the ordering of nodes in the tree and the presentation mode for folders or packages. Both of them reveal a selection menu when you click on them.

The first selection determines how the nodes in the tree are sorted. The default is “Levelize”, which sorts the nodes in a way that minimizes upward going dependencies and also computes the level for each node, so that we can ad the horizontal levelization dividers to the visualization. But you also have the option to sort alphabetically or by element size.
The presentation mode decides how to display folders and packages. “Hierarchical” displays folders exactly like they are organized in your file system. “Compact” combines nested folders that only have a single child. You can see that in the screenshot further up where com/hello2morrow/arctree is combined into a singe node. This is also the default display mode. “Flat” means all packages folders are not nested in each other, but displayed next to each other. “None” gets rid of packages and folders all together and only displays all source files next to each other. Please note that switching to this mode can take quite some time for larger projects with many cyclic dependencies.
The “gear” button will bring up the “Settings” dialog.

The screenshot shows the default settings, i.e. we ignore test code and do not track dependencies to the three external packages listed there.
At last the “Info” button brings up the product info dialog for ArcTree. Here you can configure your license, user interface settings, check the product version, the release notes and find a link to this tutorial.
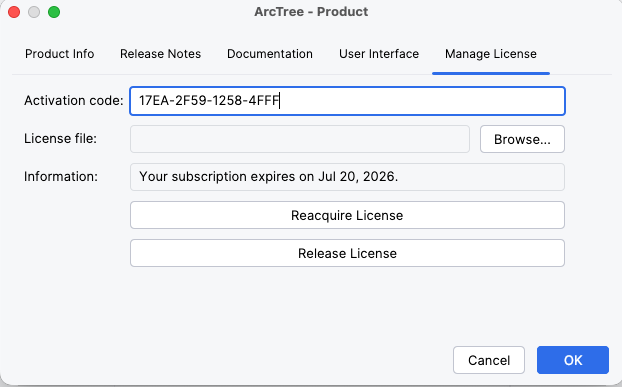
Regarding licensing you have the choice between file-based license and activation code-based licenses. If you cannot access the Internet from IntelliJ you will have to use file-based license. To create a license file navigate to Account/Your Licenses on our website and then click on “Create License File”. It will ask you for your user name on the target machine and one MAC address of your computer. File-based evaluation licenses work on any machine, so in that case there is no need for providing a user name or a MAC address. If you mostly have Internet access, using activation code-based licenses is much easier.
Once you bought a subscription you can copy the activation code from “Account/Your Licenses” on our website into this dialog or create a license file. The activation code will stay unchanged as long as you maintain your subscription.
If you want to move your work to another computer, just click on the “Release License” button. That only works for activation code-based licenses. File-based licenses can be managed on our website under Account/Your Licenses. For example, if you switch to a new computer you can manually delete your old license ticket from there, which makes it available for your new computer.
Navigation
I already mentioned that a double click in the dependencies view will jump to the code causing this specific dependency. If you double click on a source file or programming element in the ArcTree tool window, it jumps to the definition of that element in the editor. If you right click in the dependency tool window, it opens a context menu that allows you to jump to the source position of either the outgoing or incoming end of the dependency.
Right clicking on an element in the ArcTree tool window allows you to show the element either in an editor window or in the project view. And right clicking on an element in the project view gives you the “Show in ArcTree” context menu entry if the element is part of the ArcTree model.
Focus Concept
Expanding ArcTree nodes in a larger project can pretty quickly lead to an overwhelming amount of dependencies displayed in the tool window. But in most cases users are only interested in a subset of the dependency model. For example they want to analyzes dependencies for a given class or a given package. That is where the focus concept of ArcTree comes in. Setting a focus allows you to only show the elements you are interested in. To set a focus right click in the ArcTree tool window to bring up the context menu and select “Set Focus…”. This will bring up the focus dialog:

Here you can define the focus based on the current selection. The default setting “In/Out” will show all incoming and outgoing dependencies of the current selection. All other elements will be hidden. If you select “No Additional” only the elements in the current selection and the dependencies between them will stay visible.
Transitive dependencies include also indirect dependencies. E.g. if A depends on B and B depends on C, A also depends transitively on C. We have two different modes for transitive dependencies: “file based” and “programming element based”. In the “file based” mode we follow dependencies on the basis of source files. E.g. is you focus on transitive incoming dependencies for a method f() and a class C, we will get all the source files that use anything defined in the source file of f() directly or indirectly, not only references to f().
If you do the same in “programming element based”, you will only get direct and indirect users of method f(), which can be a much smaller set compared to the “file-based” mode.
You can also restrict displayed dependencies by dependency type. E.g. you could only display dependencies that create new instances or write to a field.
Once a focus is set, you can always clear it via the context menu. You can also remove elements from the current focus via the context menu, as you can add to the focus. E.g. you can select one of the elements in ArcTree and then add all incoming dependencies of that element to the current focus.
Use ArcTree to Write Better Code
Now that the functionality of ArcTree has been explained, let me end with a couple tips that will lead to better outcomes. We know that many non-trivial systems that are developed over many years end up as the dreaded big ball of mud. A major reason is that it is very easy for developers to introduce problematic dependencies without being aware of the structural issues introduced by that. With ArcTree you can always see the overall dependency structure of your system. A very easy rule of thumb is to avoid upward going dependencies whenever possible. If they are needed, make sure that you minimize the number of elements with a red background – those are the ones participating in a cyclic dependency. Limit cyclic dependency groups to at most 5 elements and avoid cycles between packages.
Just doing that will lead to a system that is better than 90% of systems with comparable size and complexity.
There is, however, a notable exception from this recommendation. If you use ORM mappers like Hibernate other JPA implementations, domain classes are often connected by bidirectional dependencies (every time you have relationships between tables). While those cycles are not ideal from a theoretical point of view, you can tolerate them for practical reasons. In other words, you can ignore cycles between domain classes, if those cycles are caused by code generation or the nature of your ORM mapping technology.
How to Ask for Help
If you run into a problem, have a question or have ideas for improvements or new features, please use our support desk.